Table of Contents
1. Explanation, Pros, Cons
In our previous discussion, There are 4 scenario that I’ve mentioned. This time, we will discuss about tunneling local server, which should only be accessible through intranet/LAN, as a dedicated server that can be accessed through internet.
Disclaimer: I’ve planned to write this 7 months ago, but due to procrastination, I postpone it today and split it into 2 part to make my life easier.
Why This Method instead of Steam Multiplayer
- This game has major flaws, where host data = world data. You can migrate this server as dedicated server, at cost of losing host player progression
- This game server requirement is very insane that it’ll dump all the workload to host. If the host device spec is low, it’ll be very sluggish.
- As someone who is using cheap internet provider behind NAT technology, sometimes our ISP just want to ruin everything by making their competing provider can’t connect to them correctly by having connection spikes.
Why not Rent a Dedicated Server
- it’s expensive, don’t wanna spend more than half of the game price monthly.
:)))
Another Option
If you’re not quite tech guy and want instant method, there is actually some online services, though you should be aware of their server location latency and try it first:
Or if you want another self hosted setup:
Find more alternatives here: https://github.com/anderspitman/awesome-tunneling
Pros
- with this method, you can literally turn any LAN game server online and play with your friends.
- in some cases, more stable than your direct steam multiplayer mode.
Cons
- Since we will use a cheap server as tunneling, it supposed to be doubling the latency, compared to rented dedicated server.
- Here is an example:
- you rent a server in the same country
- your ping to the server is 10ms
- your friend’s ping to the server is 15ms
- your game server total ping is ~25ms
- Here is an example:
- the server probably won’t run 24/7, since you’ll turn it off occasionally. in my case, it’s usually 16/24 a day
- server (your device)‘s durability will be faster to run out since you use it continuously
2. Preparation
- A sacrificial device that’ll run as dedicated server. Make sure this device has satisfy the requirement stated here: https://docs.palworldgame.com/getting-started/requirements/
- Cheap VPS hosting that doesn’t strictly prohibit light tunneling activity.
- Note: please make sure this server is nearby your current country to make the connection more stable. For example, I choose Indonesian based server since I’m currently using Indonesian’s ISP at Indonesia.
- Knowledge of Docker and Docker Container
- Knowledge of WSL2 (if using Windows)
3. Setup
Tunnel Server
Note: In this guide, I’ll use ubuntu as base tutorial command, feel free to search corresponding guide for other OS.
- Install wireguard tools & nftables
sudo apt update && sudo apt upgrade -y
sudo apt install wireguard-tools nftables
- Generate your key
wg genkey | tee privatekey.key | wg pubkey > publickey.pub
Note: you can use cat privatekey.key and cat publickey.pub to see and copy the content.
in this tutorial we will use:
- Server:
- private key: eBYIwdLD6GsXdcZvAJDow1N15TdEDpwZh8NkUoVplFM=
- public key: hW2VH25Q1wUCHEdyIc7/ht44urG+917d34nwsznSUyc=
- Client:
- private key: EPcFUviMlTTs1Th72TEQWtx6jzK62+/+kV551+0xvl4=
- public key: z09I2S7aEeAP12/F2z4wfJxZjG9nUd+//EkyO63cvEs=
- Create wireguard config
sudo nano /etc/wireguard/wg0.conf
- Enter this config, adjust key & things if needed, then save and exit:
[Interface]
Address = 10.0.0.1/24
ListenPort = 51820
PrivateKey = eBYIwdLD6GsXdcZvAJDow1N15TdEDpwZh8NkUoVplFM=

[Peer]
PublicKey = z09I2S7aEeAP12/F2z4wfJxZjG9nUd+//EkyO63cvEs=
AllowedIPs = 10.0.0.2
- Create nftables config
sudo nano /etc/nftables.conf
- Enter this config, adjust key & things if needed, then save and exit:
#!/usr/sbin/nft -f

flush ruleset

table inet filter {
        chain input {
                type filter hook input priority 0;
        }
        chain forward {
                type filter hook forward priority 0;
        }
        chain output {
                type filter hook output priority 0;
        }
}

table ip nat { # handle 1
        chain prerouting { # handle 1
                type nat hook prerouting priority dstnat; policy accept;
                udp dport 8211 dnat to 10.0.0.2 # handle 10
        }

        chain postrouting { # handle 2
                type nat hook postrouting priority srcnat; policy accept;
                masquerade # handle 8
        }
}
- Apply the config & start wireguard server
sudo systemctl restart nftables
wg-quick up wg0
Host Server
Note: in this setup, we will use ubuntu inside WSL2, for mac and other linux distro, please adjust the step
- Install WSL 2 (Windows). if you’re using Linux, skip to point 3
- Install Ubuntu For WSL 2, then open it
- Install Wireguard & Docker
sudo apt update && sudo apt upgrade -y
sudo apt install wireguard-tools
sudo apt install -y apt-transport-https ca-certificates curl software-properties-common
curl -fsSL https://download.docker.com/linux/ubuntu/gpg | sudo gpg --dearmor -o /usr/share/keyrings/docker-archive-keyring.gpg
echo "deb [signed-by=/usr/share/keyrings/docker-archive-keyring.gpg] https://download.docker.com/linux/ubuntu $(lsb_release -cs) stable" | sudo tee /etc/apt/sources.list.d/docker.list > /dev/null
sudo apt update
sudo apt install -y docker-ce docker-ce-cli containerd.io docker-buildx-plugin docker-compose-plugin
sudo usermod -aG docker $USER
- Restart the server (Linux & WSL)
# on powershell/cmd if using windows
wsl --shutdown
- create palworld directory
- create file docker-compose.yml inside palworld directory

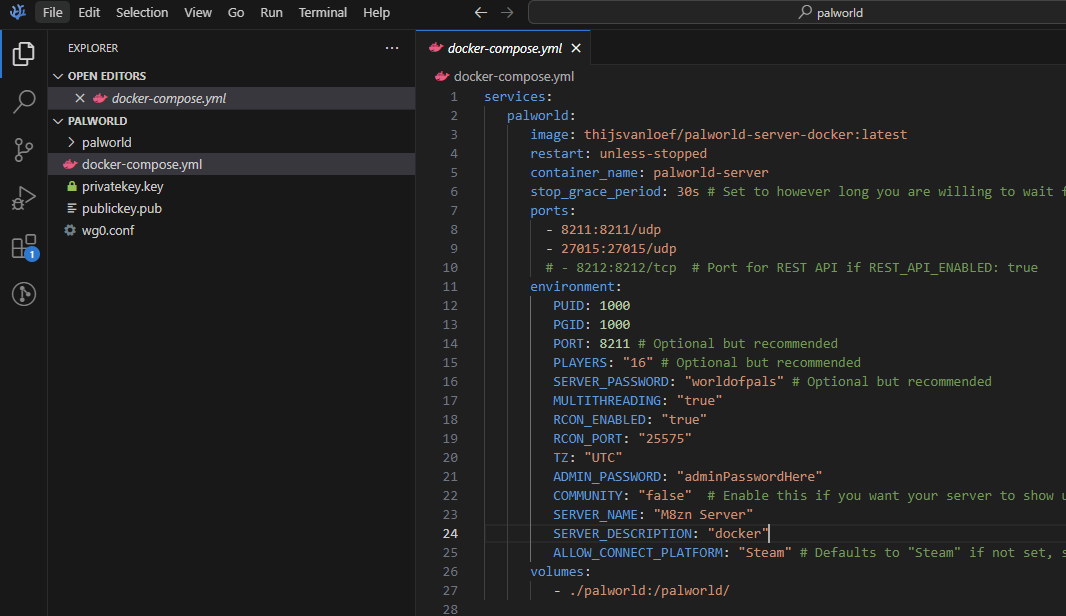
- edit using whatever method, we will use https://github.com/thijsvanloef/palworld-server-docker as server. input and adjust this:
services:
  palworld:
    image: thijsvanloef/palworld-server-docker:latest
    restart: unless-stopped
    container_name: palworld-server
    stop_grace_period: 30s # Set to however long you are willing to wait for the container to gracefully stop
    ports:
      - 8211:8211/udp
      - 27015:27015/udp
      # - 8212:8212/tcp  # Port for REST API if REST_API_ENABLED: true
    environment:
      PUID: 1000
      PGID: 1000
      PORT: 8211 # Optional but recommended
      PLAYERS: "16" # Optional but recommended
      SERVER_PASSWORD: "worldofpals" # Optional but recommended
      MULTITHREADING: "true"
      RCON_ENABLED: "true"
      RCON_PORT: "25575"
      TZ: "UTC"
      ADMIN_PASSWORD: "adminPasswordHere"
      COMMUNITY: "false" # Enable this if you want your server to show up in the community servers tab, USE WITH SERVER_PASSWORD!
      SERVER_NAME: "M8zn Server"
      SERVER_DESCRIPTION: "docker"
      ALLOW_CONNECT_PLATFORM: "Steam" # Defaults to "Steam" if not set, set this to "Xbox" if you want to host a server for Xbox players. CROSSPLAY BETWEEN XBOX-STEAM IS NOT YET SUPPORTED
    volumes:
      - ./palworld:/palworld/
- run the docker server (inside palworld directory)
docker compose up -d
- monitor the docker server using
docker logs -f palworld-server. - wait for the initial server download,
until there is
[LOG] RCON executed the command. ShowPlayersmessage, you’re successfully started the server (locally). then press CTRL+C to exit the monitoring - setup the wireguard server, edit wg0.conf
sudo nano /etc/wireguard/wg0.conf
- insert this, adjust the Endpoint to match your server IP address, save and exit
[Interface]
PrivateKey = EPcFUviMlTTs1Th72TEQWtx6jzK62+/+kV551+0xvl4=
Address = 10.0.0.2/32

[Peer]
PublicKey = hW2VH25Q1wUCHEdyIc7/ht44urG+917d34nwsznSUyc=
AllowedIPs = 10.0.0.1/32
Endpoint = 1.2.3.4:51820
PersistentKeepalive = 25
- start the wireguard
wg-quick up wg0
- try ping the tunnel server, should be success. if RTO, there’s something wrong with your config
ping 10.0.0.1
- from the tunnel server, ping the client via 10.0.0.2, if RTO, it’s ok actually,
just make sure to check
sudo wgcommand in Host Server. iflatest handshakeand transfer received exist, you’re good to go
latest handshake: 1 minute, 31 seconds ago
transfer: 10.36 KiB received, 13.05 KiB sent
Game Client
- Open Palworld
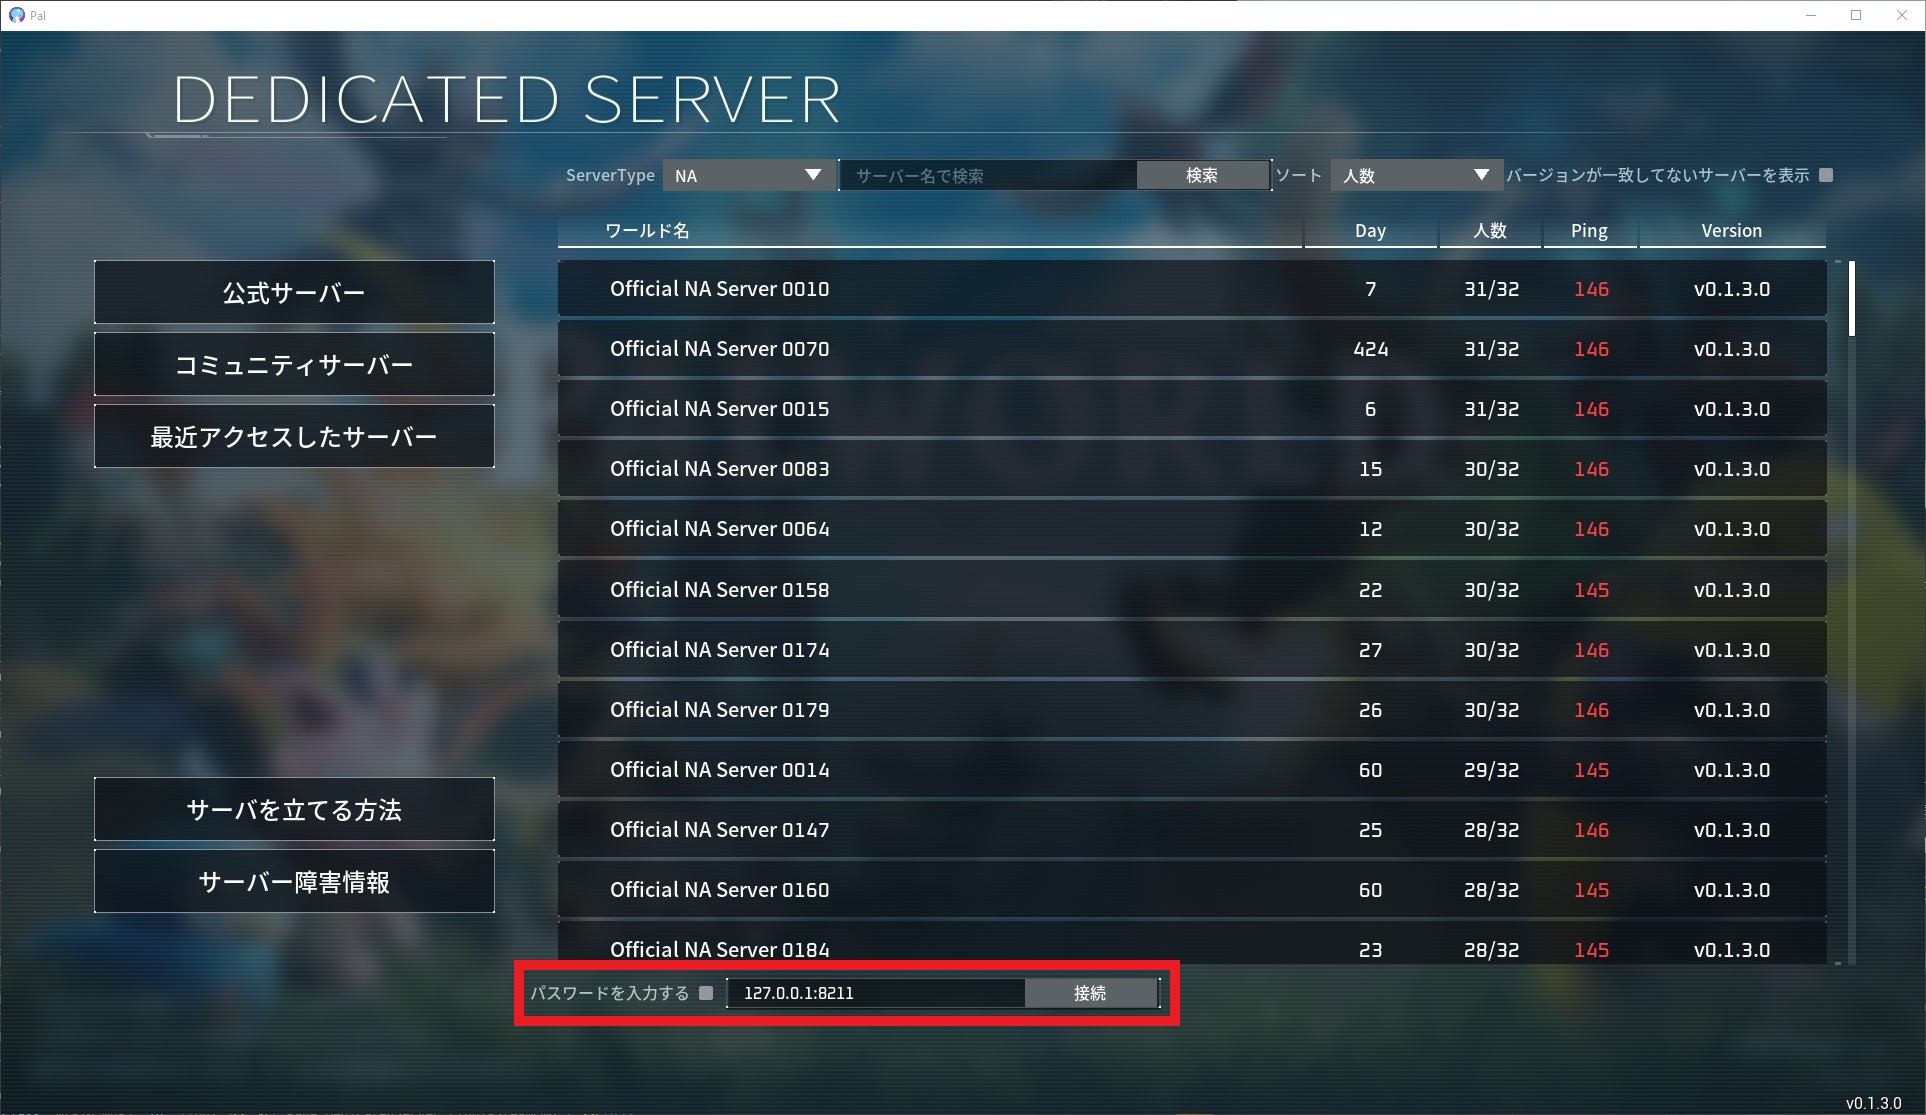
- Click
Join Multiplayer Game - enter your tunnel server public IP address and port, for example:
1.2.3.4:8211
- should be connected now
